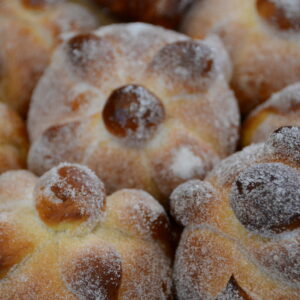
Pan de muerto (Day of the Dead Bread)
The bread we eat for Día de Muertos is one of those we wish we had at home year-round, however, at least at home, it's just available between October 25 and November 3.
Utensilios/Equipment/Ustentsiles
- Big Bowl
- Plastic dough scraper
- Baking sheet (preferably 2)
- Stand mixer with bowl (it may be done by hand as well)
- Hook attachment for the stand mixer
- 2 Small bowls
- Brush
- Medium bowl
Ingredientes/Ingredients/Ingrédients
For the dough:
- 240 g All-Purpose flour
- 9 g Active-Dry yeast
- 50 g granulated sugar
- 3 g salt
- 80 g unsalted butter
- 2 eggs
- 1 orange zest
- 30 ml water
- 3 ml orange blossom water
- cooking oil
To decorate:
- water
- 1 egg
- 50 g unsalted butter
- granulated sugar to sprinkle on top
Preparación/To Prepare/Préparation
- To begin with the dough, spread the flour in a well, or a volcano, leaving the space of the crater empty.
- Spread the dry active yeast on the outside of the well.
- In the center of the well (the volcano crater), add 1 ½ tablespoons sugar, 2 eggs, ½ teaspoon salt, and half the butter needed fort dough, i.e., 1 ½ tablespoons butter previously softened.
- Start mixing all the ingredients with your fingers from the inside towards the outside, integrating flour and yeast with the ingredients from the center of the well. Once you work the ingredients into a single mixture, add the 2 tablespoons of water and knead until a uniform dough consistency.
- Extend a bit the dough to integrate the rest of the butter (1 ½ tbsp), the orange zest, the orange blossom essence, and the remaining 1 ½ tablespoons sugar.
- Integrate everything into the dough. It will become sticky, but there’s nothing to worry, just keep kneading it until it becomes compact again.
- This process will take about 20 minutes or so, since the kneading takes place in order to develop gluten and make the dough become elastic. If you decide to use your stand mixer with the hook attachment, the whole mixing and kneading process will take about 10 minutes instead of 20.
- Smear a bowl with cooking oil. I personally prefer sunflower or grapeseed. Put the dough in the bowl and cover with a damp cloth in a warm place for about 45 minutes for the fermentation to take place and the dough to double its size.
- In the meanwhile, prepare a baking sheet with some parchment paper, or flour the baking sheets if you’d rather.
- Once the fermentation has taken place, “punch” the dough to extract the generated gas. Then, knead the dough for a moment in an orderly fashion just to make it compact once more.
- Take small portions of about 2 oz. to make the individual pieces of bread. Mold them, and separate two portions to work on the bone-like decorations for the bread.
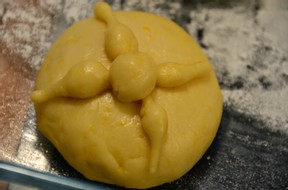
- To mold the pieces of bread, take a portion under the palm of your hand and on the work surface. With your fingers towards the inside, press the dough just a tad and make the dough go round on the table until obtaining a firm uniform ball. Place all the balls on the baking sheet and press a little on the center to flatten them a bit to let them expand.
- With the portions previously reserved form the bone-like decorations for the bread. These bone-like decorations I made them as if I was forming snakes with the dough, and for the irregularities, make some of the sections finer by pressing the dough in some sections . This will make the dough that you haven't pressed a bit thicker.
- Brush each of the portions with water, but only making a cross in the center of each bread where the bone-like decorations are to be placed. Then repeat the brushing, but only in the very center to stick the bone-like decoration that crowns the bread in the form of a sphere.
- Once the mounting has been done, let the bread rest for another 30 minutes. This will allow the breads to double their volume.
- When the second fermentation has taken place, brush the breads completely with egg wash for the breads to come out with a nice shiny color.
- Pre-heat the oven for 10 minutes at 400 °F (200 °C) and put the baking sheet with the breads inside to be baked. Lower the heat to 350 °F (180 °C) for about 20 minutes or until the bread has its base cooked.
- When taking the breads out of the oven, melt the last ¼ cup butter to brush over the breads and sprinkle generously with sugar.
Notas/Notes
* Oven preheated to 400 °F or 200 °C to bake at 350 °F or 180 °C